Have you ever looked at a plain piece of wood and imagined it becoming something more? A bookshelf holding your favorite stories, a sturdy bench for your garden, or even a simple box to keep treasures in. That act of transformation, of creating something solid and useful from raw material, is at the heart of carpentry. It’s a skill that feels almost magical, but I’m here to tell you it’s wonderfully accessible. If you’ve ever felt the urge to build but didn’t know where to start, you’re in the right place. This guide is your friendly welcome into the world of carpentry.
Let’s clear something up first. People often use “carpentry” and “woodworking” like they’re the same thing. While they’re close cousins, there’s a subtle difference I’ve learned over the years. Traditionally, carpentry is about the structural stuff – framing houses, building roofs, installing flooring. It’s often done on-site and is about making things strong, square, and functional. Woodworking, on the other hand, tends to focus on finer, detail-oriented projects like furniture, cabinets, and decorative objects, usually in a workshop. Think of it like this: a carpenter builds the skeleton of your house, and a woodworker crafts the kitchen table that goes inside it. Today, especially for hobbyists, the lines have blurred beautifully. What we’re talking about here is really the foundational skills that apply to both – the joy of working with wood.
Before we even pick up a tool, we need to talk about the single most important part of any project: safety. This isn’t a boring lecture; it’s the golden rule. My own wake-up call came early when a tiny splinter flew past my safety glasses. It was a harmless incident, but it drilled the lesson home. Always, always wear safety glasses. Sawdust and flying debris don’t care about your plans. When using loud power tools like routers or planers, hearing protection is non-negotiable. A dust mask is wise for sanding. And perhaps the most important tool is your mind. Be present. Don’t work when you’re exhausted or distracted. Rushing is the fastest way to make a mistake, and in this craft, mistakes can be more than just a ruined board.
Now, the fun part: tools. Walking into a hardware store can be overwhelming. You don’t need to buy the entire aisle. Start simple. Your true beginner’s kit has just a few heroes. First, a tape measure. A 25-foot Stanley PowerLock is an industry standard for a reason. Second, a quality pencil and a combination square. This little L-shaped metal tool is your best friend for marking straight lines and checking for square, which is the secret code for “perfectly 90 degrees.” For cutting, a circular saw is the most versatile first power tool. It’s the workhorse. Pair it with a good straight edge or a speed square to guide it. You’ll need a drill/driver. A cordless combo kit is a fantastic investment. For joining things, start with a hammer, some screws (I prefer star-drive or square-drive, as they strip less than Phillips), and a bottle of wood glue. A sanding block and some assorted grit sandpaper (start with 120-grit) will round out your kit. That’s it. With these, you can build a surprising amount.
Facing the lumber rack is like being in a library where all the books are in a foreign language. Let’s translate. You’ll mainly encounter softwoods like pine, spruce, and fir. They’re lighter, generally cheaper, and easier to work with, making them perfect for practice. Hardwoods like oak, maple, and walnut are denser, more expensive, and used for fine furniture. Then there’s plywood – sheets made of thin wood layers glued together. It’s stable and doesn’t warp easily. A pro-tip: wood at big-box stores is often wetter and can warp as it dries in your home. For early projects, consider “project panels” or ask for the straightest boards you can find. Don’t be shy about picking through the pile!
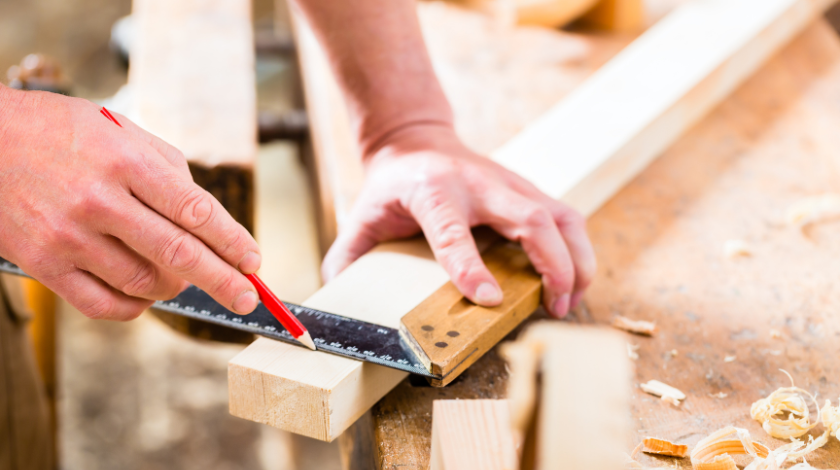
All of carpentry rests on three pillars: Measuring, Marking, and Cutting. Get these right, and everything else follows. The old saying “measure twice, cut once” is gospel. Use your tape measure clearly. When marking a cut line, use your combination square to draw a sharp, fine line all around the board, not just on the top. This “knife wall” helps you see the line from all angles. For cutting with your circular saw, always support your wood. Never let it pinch the blade. Use sawhorses or even a piece of rigid foam on the ground. The key to a straight cut is guiding the saw’s base plate along your square, not just following the line with your eye. Your first cuts will be wobbly. That’s okay. Practice on scrap wood. I still have my first, hilariously crooked cut piece of two-by-four. It’s a trophy of progress.
Let’s build something! Your first project shouldn’t be a dining table. Start small and successful. A simple, wall-mounted shelf is perfect. You’ll practice measuring, cutting, and fastening. For a basic 24-inch shelf, you’ll need a 1×8 pine board (which is actually 0.75 inches thick and 7.25 inches wide – that’s a whole other story about “nominal” sizing!), two shelf brackets, and your tools. Cut the board to length. Sand all the edges smooth, rounding them over slightly. Apply a finish – even a simple wipe-on polyurethane or a coat of Danish oil makes wood look and feel amazing. Then, using your level, mark on the wall where the brackets go, screw them into the wall studs, and place your shelf on top. The moment you stand back and see something you made, holding a plant or a book, is addictive. That feeling is why people get into this craft.
As you gain confidence, you’ll naturally want to learn stronger construction methods. This is where joinery comes in – the art of connecting wood without relying solely on nails or screws. A great beginner technique is the pocket hole joint. A special jig lets you drill a angled hole, allowing a screw to pull two pieces of wood together tightly and almost invisibly. It’s a game-changer for building frames and cabinets. Then there’s the dado, a groove cut across the grain to perfectly seat a shelf. These techniques feel advanced, but they’re just the next logical step.
Remember, every expert was once a beginner who embraced the mess. Your first projects might have gaps. Your cuts might not be perfect. I’ve built my share of “rustic” (a generous term for wobbly) pieces. Each one taught me more than any perfect project ever could. Carpentry is a lifelong conversation between your hands, your mind, and the material. It teaches patience, problem-solving, and gives you a profound sense of capability. So, start simple, respect the tools, and let yourself learn. The sawdust will get everywhere, but the satisfaction of making something real, something from your own imagination, will stick with you forever. Welcome to the workshop.
Conclusion
Carpentry is far more than a set of skills; it’s a gateway to a more creative and self-reliant life. It begins with understanding the fundamental difference between carpentry and woodworking, respecting the paramount importance of safety, and assembling a modest, thoughtful toolkit. By conquering the basics of measuring, marking, and cutting, and by choosing simple, achievable projects, you build not just objects, but immense confidence. The journey from a rough board to a finished piece is filled with tangible lessons in patience and precision. Embrace the mistakes as essential teachers, and allow each project to guide you to the next level of skill. The world of wood is waiting for you to leave your mark on it.
FAQ
Q: Is carpentry hard to learn?
A: The fundamentals are not hard to learn, but they take practice to master. Like any skill, it starts with simple steps. The challenge is part of the reward, and the sense of accomplishment from your first completed project makes it all worthwhile.
Q: How much money do I need to start carpentry as a hobby?
A: You can start meaningfully for a few hundred dollars by focusing on core tools: a circular saw, drill/driver, combination square, tape measure, and some clamps. It’s better to buy a few quality tools than many cheap ones. You can add tools as your projects demand them.
Q: What is the single most important tool for a beginner?
A: While power tools are flashy, the most important tool is a good combination square. Accuracy in marking and checking your work is the foundation of every good project. Without it, even the best saw won’t help you.
Q: What’s the best wood for a total beginner?
A: Start with softwoods like pine or spruce. They are affordable, readily available, and easier to cut and sand. Avoid expensive hardwoods for your first few projects; learn on the forgiving, cheaper stuff.
Q: How do I find plans for beginner projects?
A: There are fantastic free resources online on sites like YouTube (channels like Steve Ramsey’s Woodworking for Mere Mortals are brilliant for beginners), Ana White, and popular woodworking blogs. Start with plans labeled “beginner” or “easy” that use basic construction methods.